Translate
Tuesday, June 18, 2013
How to recover deleted/lost photos, video from Samsung Galaxy Note 2 external SD card?
Samsung Galaxy Note 2 users who try to recover deleted/lost photos, video with a Photo Recovery program will be disappointed to find that neither the internal memory nor the external SD card of the phone can be found the the recovery program.
The reason why your Note 2 storage device can’t be detected the recovery application is that recovery tool need an actual mounted drive to dig deep and unearth lost files. To make your Galaxy Note 2 internal memory or external SD card mount as a drive, you can enable USB Mass Storage mode on the phone. Unfortunately, USB mass storage mode is not working on Samsung Galaxy Note 2, because it seems like Samsung disabled it somehow. There are only two USB file transfer modes available, the MTP and PTP, which aren’t useful for recovery program.
Therefore, both the Internal Memory and external SD card on your Galaxy Note 2 will not mount as a drive when connecting you directly connect your phone to the computer. However, unlike Internal Memory, the external SD card can still mount as a storage drive if you insert it into a card reader or insert into another phone that has enabled USB Mass Storage Mode on the phone.
The good news is that if all the files lost from your Galaxy Note 2 are stored on the external SD card, you are fortunately enough to recover them back with Photo Recovery program.
So make sure to get a large capacity external SD card for your Samsung Galaxy Note 2 to store your important files such as photos, music, video, etc, then even if they lose, you still have the opportunity to restore them back.
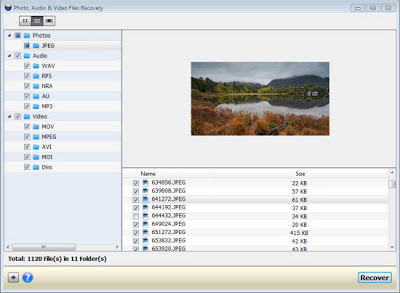
Screenshot:
Friday, June 14, 2013
Samsung Galaxy S2 Recovery, recover deleted photos video from Galaxy S2 Internal Memory or MicroSD card
To enable Data Recovery tool to scan your Samsung Galaxy S2 internal memory and microSD card, they should be recognized by the computer as a USB flash drive, which can be archived by enabling mass storage mode on the phone. And you can go with the following steps to enable USB Mass Storage Mode on Galaxy S2.
Samsung Galaxy S2 with Android 2.3
1. Go into “Settings>Applications>Development” to enable “USB debugging” on your Galaxy S2.
2. Drag the status bar down and tap on “USB connected”. And then the “USB connected” screen with a large green Android icon will appear. Tap on “Connect USB storage”.
3. Click “OK” in the appearing confirmation dialog box. And then the green Android icon will turn to orange, indicating that the phone is now in USB Mass Storage Mode.
Samsung Galaxy S2 with Android 4.0
1. Go into “Settings>More>USB utilities” and then click “Connect Storage to PC”.
2. Then plug one port of your USB cable into your Galaxy S2 and connect the other port to the computer.
3. The “USB connected” screen with a large green Android icon will appear, hit “Turn on USB storage”.
4. A confirmation dialog box will appear. Tap “OK”. Then the green Android icon will turn orange, indicating that the phone is now in USB Mass Storage mode. And your phone will appear as USB disk drives in “Devices with Removable Storage” and be assigned drive letters.
After successfully enabling USB Mass Storage on your Samsung Galaxy S2, both your internal memory and external memory on your phone will mount as a drive when connected with the computer, then you can utilize Photo Recovery tool to recover deleted photos video from Samsung Galaxy S2 internal memory or microSD card on both Windows and Mac.
Samsung Galaxy S2 with Android 2.3
1. Go into “Settings>Applications>Development” to enable “USB debugging” on your Galaxy S2.
3. Click “OK” in the appearing confirmation dialog box. And then the green Android icon will turn to orange, indicating that the phone is now in USB Mass Storage Mode.
Samsung Galaxy S2 with Android 4.0
1. Go into “Settings>More>USB utilities” and then click “Connect Storage to PC”.
2. Then plug one port of your USB cable into your Galaxy S2 and connect the other port to the computer.
3. The “USB connected” screen with a large green Android icon will appear, hit “Turn on USB storage”.
4. A confirmation dialog box will appear. Tap “OK”. Then the green Android icon will turn orange, indicating that the phone is now in USB Mass Storage mode. And your phone will appear as USB disk drives in “Devices with Removable Storage” and be assigned drive letters.
After successfully enabling USB Mass Storage on your Samsung Galaxy S2, both your internal memory and external memory on your phone will mount as a drive when connected with the computer, then you can utilize Photo Recovery tool to recover deleted photos video from Samsung Galaxy S2 internal memory or microSD card on both Windows and Mac.
Saturday, June 8, 2013
Sony Xperia Recovery, recover deleted/lost photos, video from Sony Xperia Ion/TL/P/S/Sola
Sony Xperia is the family of Sony smartphones and tablets. The line has been manufactured since 2008 and currently accounts for more than half of the company’s mobile phone sales.
Best Sony Xperia 2012 smartphone models: Sony Xperia TL, Sony Xperia S, Sony Xperia SL, Sony Xperia P, Sony Xperia ION, Sony Xperia Sola
If you own one of the above mentioned Sony Xperia smartphones and unfortunately lose some of your important files such as photos, video or audio files from the phone internal memory or external microSD card. You are fortunately enough to recover the lost files with Photo Retrieval, a qualified recovery application specially designed for dealing with Mobility file lost problems.
The program will treat your phone’s storage device as a mounted drive, dig deep and unearth deleted/formatted/damaged photos, video and audio files from both Sony Xperia internal flash memory and external memory card.
Steps to recover deleted/lost photos, videos and audio from Sony Xperia TL/P/S/Sola
1.Launch Photo Retrieval with the recovery wizard interface, hit “Next” to start the recovering process.
2. Specify the storage device to scan.
Enable USB Mass Storage connection mode on your Sony Xperia smartphones, so that both the internal memory and external microSD card of your phone can be mounted as a drive to allow the Recovery tool to scan for lost files.
When the program detects your phone’s storage device, it will display it on the main panel of the program as a “Removable Media”, select it and then hit “Next” to proceed.
3.Specify image file types to recover.
Specify and check the image file types such as “.bmp”, “.gif”, “.jpg, .jpeg”, “.png” as the file types to recover for Sony Xperia., and then hit “Next” to start the recovery process.
4.Recover deleted/lost photos from Sony Xperia.
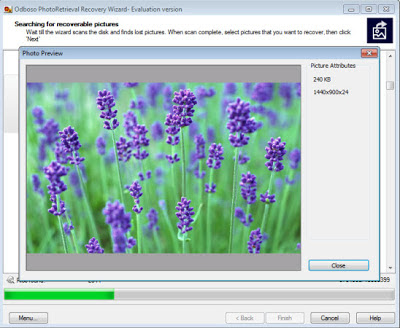
During the recovering process, thumbnails of the recoverable files will be listed on the program main panel, double click the thumbnails to view the files in large size.
When the scan is complete, check the image files you wish to recover, then hit right-bottom “Next” button to begin the recovering process.
Wednesday, June 5, 2013
How to recover deleted/lost files from Samsung Galaxy S3 internal flash memory or microSD card?
Samsung Galaxy S3, the third phone of the Galaxy series, packs in a plethora of new features on top of Android 4.0 Ice Cream Sandwich. Unfortunately, this time, Samsung has decided to strip out support for USB Mass Storage mode in favor of MTP (Media Transfer Protocal) for some unknown reasons. The fact that MTP allows simultaneous use of data on the phone and PC could be a possible reason.
For Samsung Galaxy S3 users, you may accidentally deleted some needed photos, videos or other media files from your Galaxy S3 internal flash memory or external microSD card. When you try to recover the deleted files from your phones internal flash memory or external SD card with Data Recovery tool, you may disappointed to find that the recover program can not detect your phone storage device.
The issue is that Data Recovery tools need an actual mounted drive in order to dig deep and unearth your deleted media files by accident. Since the internal flash memory and external microSD card of your Samsung Galaxy S3 mounts as MTP/PTP which is not treated as a mounted drive and therefore can not be scanned by the Data Recovery tools.
To let your Data Recovery tool successfully detect your Galaxy S3 internal memory and microSD card, you can refer to the following solution.
How to scan and recover Galaxy S3 internal flash memory?
1.Backup the entire internal memory partion to your computer as a single, massive .RAW file.
2.Convert the .RAW file output to a VHD
3.Mount the VHD as a disk in Disk Manager.
4.Scan the attached VHD volume for files that have been deleted and recovery them.
For further detailed recover steps please visit: Internal Memory Data Recovery
How to scan and recover Samsung Galaxy S3 external microSD card?
Take the microSD card out from your Samsung Galaxy S3 and connect it to your computer via a card reader, and then the recovery program will mount your external card as a storage device.
Then your can utilize Photo Recovery program to recover deleted photos, video or audio files from Samsung Galaxy S3 external microSD card on both Windows 8/7/Vista/XP and Mac OS X Mountain Lion/Lion/Snow Leopard/Leopard.
Screenshot:
Subscribe to:
Posts (Atom)